|
|
Network inventory software
Hardware and software inventory |
| » Network Asset Tracker Pro |
| » Network Asset Tracker |
| » Free PC Audit |
| » Remote Desktop Screenshot |
| » Download |
| » Order Now |
| » Support |
| » Press & News |
|
[an error occurred while processing this directive]
|
|
|
[an error occurred while processing this directive]
|
[an error occurred while processing this directive]
|
- Platform:
- Windows 8
- Windows 7
- Windows 2008
- Windows Vista
- Windows 2003
- Windows XP
- Windows 2000
- Windows NT
- Windows Me
- Windows 98 (with WMI CORE)
-
Hardware requirements:
- Memory: 128MB RAM
- Processor: Pentium-500 MHz
- Space required on your hard disk: 10MB
- Video mode: true color
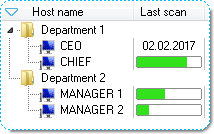
On the left side of main window you can see a list of computers, along with host name, IP-address and the date when information was last updated.
You can organize your computers by groups (folders). For this you can use drag and drop.

 - folder with computers or folders (for example, it might be department or room).
 - computer is off-line.
 - computer is on-line.
 - computer is on-line and "NAT Pro - Agent" detected.
When you first start the program you need to add computers of your network to the list.
-
Network Asset Tracker Pro provides three ways to scan your network:
- Enumerate network for all computers;
- Add computers by domain;
- Add computers by range of IP addresses.
Also, you can add computers to the list manually one-by-one.
Network Asset Tracker Pro enables you to scan all available computers on your network with just one click.
-
To enumerate all computers on your network perform the following steps:
- Click "Find Computers" button from the toolbar or press "F3";
- This will start scanning your network for all available computers;
- To cancel scanning process, click the "Stop finding of computers" button from the toolbar or press "F4";
- When the scanning process will complete you will see the list of computers.
-
To add computers by domain perform the following steps:
- Click "Add Computers by Domain" button from the toolbar;
- An "Add Computers by Domain" dialog box will appear on the screen;
- Type name of domain. You can leave domain name blank if the primary domain is implied;
- Click "Ok" button.
Sometimes you need to scan available computers within a particular range of IP addresses. Just provide the starting address, the last IP address and Network Asset Tracker Pro will scan all available computers between that range of IP addresses.
-
To add computers by range of IP addresses perform the following steps:
- Click "Add Computers by IP range" button from the toolbar;
- An "Add Computers by IP range" dialog box will appear on the screen;
- Type a range of IP addresses;
- Click "Ok" button.
To add computers manually you should click "Add Computer by Host Name" button from the toolbar or press "Ctrl+N". Then type a host name of the computer and click "Ok" button.
To delete computers or folders press "Del" key or select menu "Computer" -> "Delete". Then selected folders and computers will be deleted from the list.
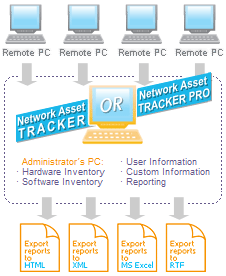
You can get information from remote computer through WMI (agentless method) or through "NAT Pro - Agent" (agent-based method). By default Network Asset Tracker Pro uses WMI. To use agent-based scan you should install "NAT Pro - Agent" on remote PC. Network Asset Tracker Pro automatically detects if "NAT Pro - Agent" is installed on remote computer.
Just select computers you want to scan and click "Get Info" button from the toolbar or press "Ctrl+I". This will start scanning remote computers.
You can set up the type of information collected from remote computers. To do this select menu "File" -> "Options", then "Scan Properties".
The account attempting remote access should be an administrator on the target computer (for example - domain administrator). If you don't have rights of the domain administrator you can use custom logon name and password for getting info from remote PC. To do this, select menu "File" -> "Options", then "Custom Logon".
If you have any problems with WMI, you can use agent installed on remote PC. You can install "NAT Pro - Agent" from main Network Asset Tracker Pro installation package. Also you can download "NAT Pro - Agent" as a standalone installation package at misutilities.com site. You can download a standard EXE-package or download a MSI-package for remote deploying through Active Directory.
- green color of computer's icon shows that "NAT Pro - Agent" is detected.
You can set up some options of agent installed on remote PC. To do this select menu "Computer" -> "Remote Agent Information".
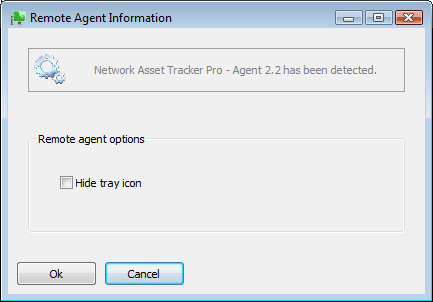
By default the icon of "NAT Pro - Agent" is visible in system tray on remote computer. You can hide this icon from system tray. To do this select "Hide tray icon" option in "Remote Agent Information" window.
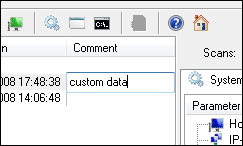
You can use custom columns for storing your custom information, for example serial number, phone number, etc... To edit data in custom column click "Edit Custom Column" button from the toolbar or click twice on custom data you want to edit.
To manage custom columns select menu "File" -> "Options". Then select "Custom Columns".
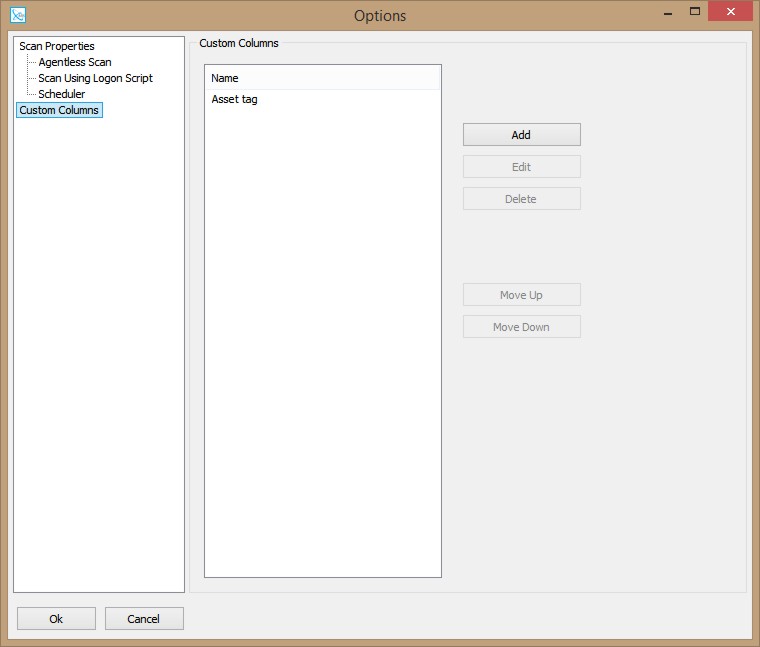
In the window "Options" you can add, delete or move custom columns up or down.
-
Network Asset Tracker Pro provides four types of reports:
- System Info;
- Software Info;
- Processes Info;
- Installed Software.
All that you need is to select report type in menu "Report", then mark information which you want to add to the report. To save settings made for report mark "Save Settings" check box.
You can export reports in HTML, MS Excel and RTF formats.
Example of list-style report: Report.
Example of sheet-style report: Report.
To enable scan schedule select menu "File" -> "Options", then select "Scheduler".
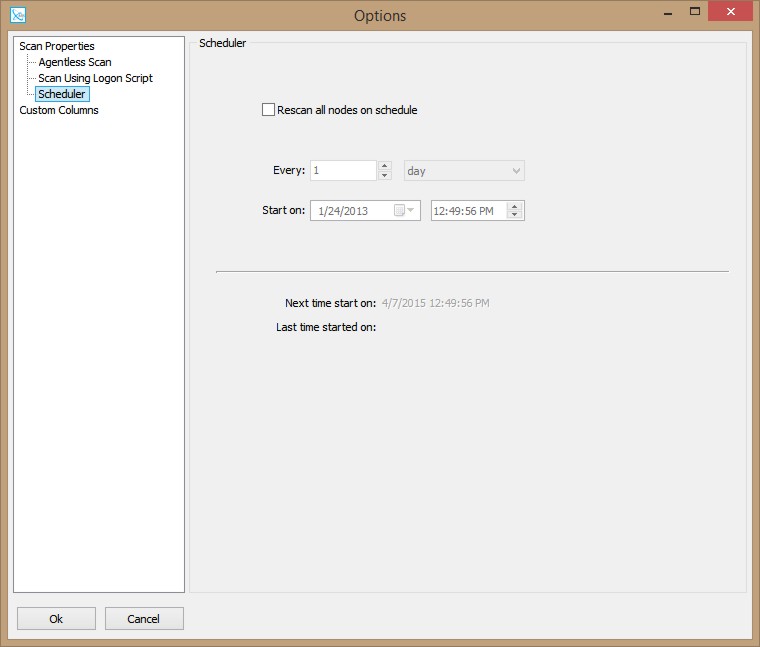
All you need is to set up next scan time and period of scans.
| ||||||
| ||||||

| ||||||
|