Network Inventory FAQ

A:Network Asset Tracker Pro is network inventory software. It helps audit hardware inventory, software inventory and software license management.
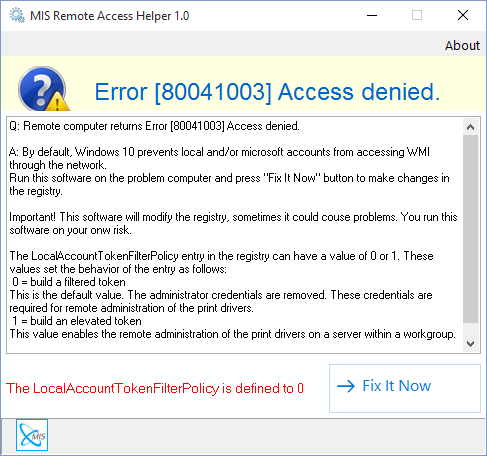
A: By default, Windows 10 prevents local and/or microsoft accounts from accessing WMI through the network.
There are two ways to fix this issue.
1. You can download our MIS Remote Access Helper and run it on the problem computer.
This siftware makes changes in the system registry to enable remote access for the local and microsoft accounts.

MIS Remote Access Helper


2. You can make changes in the registry manually.
Important! This section, method, or task contains steps that tell you how to modify the registry. However, serious problems might occur if you modify the registry incorrectly. Therefore, make sure that you follow these steps carefully.
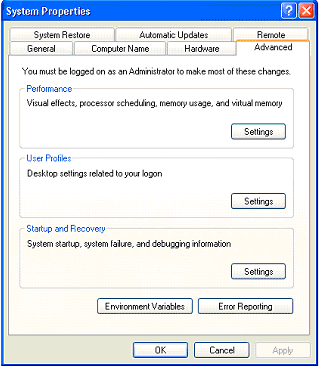
    You should do the next on remote computer:
  • Click the Start button, type regedit in the Start Search box, and then press ENTER.
  • Locate and then click the following registry subkey: HKEY_LOCAL_MACHINE\SOFTWARE\Microsoft\Windows\CurrentVersion\Policies\System
  • On the Edit menu, point to New, and then click DWORD (32-bit) Value.
  • Type LocalAccountTokenFilterPolicy to name the new entry, and then press ENTER.
  • Right-click LocalAccountTokenFilterPolicy, and then click Modify.
  • In the Value data box, type 1, and then click OK.
  • Exit Registry Editor.

The LocalAccountTokenFilterPolicy entry in the registry can have a value of 0 or 1. These values set the behavior of the entry as follows:
0 = build a filtered token
This is the default value. The administrator credentials are removed. These credentials are required for remote administration of the print drivers.
1 = build an elevated token
This value enables the remote administration of the print drivers on a server within a workgroup.
A: Network Asset Tracker Pro might not run correctly with DEP (Data Execution Prevention). You can add Network Asset Tracker Pro to a DEP exeption list or enable DEP protection only for Windows system components and services.
    To add Network Asset Tracker Pro to the DEP exception list:
  • Click "Start", and then click "Control Panel".
  • Under "Pick a category", click "Performance and Maintenance".
  • Click on "System".
  • Click the "Advanced" tab.

System Properties - Advanced tab

  • In the "Performance" area, click "Settings".

Performance Options

  • Click the "Data Execution Prevention" tab.

Data Execution Prevention tab

  • Click "Add".
  • Locate and select NATracker.exe or NATrackerPro.exe (By default "C:\Program Files\Network Asset Tracker\NATracker.exe" or "C:\Program Files\Network Asset Tracker Pro\NATrackerPro.exe"), and then click "Open".
  • In the warning box, click "OK". The Network Asset Tracker Pro now appears in the DEP program area.
  • Click "Apply", and then click "OK". A dialog box appears and informs you that you must restart your computer for the setting to take effect. Click "OK".
    To enable DEP protection only for Windows system components and services:
  • Click "Start", and then click "Control Panel".
  • Under "Pick a category", click "Performance and Maintenance".
  • Click on "System".
  • Click the "Advanced" tab.
  • In the "Performance" area, click "Settings".
  • Click the "Data Execution Prevention" tab.
  • Select the option "Turn on DEP for essential Windows programs and services only".
  • Click "Apply", and then click "OK". A dialog box appears and informs you that you must restart your computer for the setting to take effect. Click "OK".
A: Network Asset Tracker Pro uses WMI (Windows Management Instrumentation) through DCOM RPC. Please, check services: "COM+ Event system", "Remote Procedure Call (RPC)" and "Remote Procedure Call (RPC) Locator" on the problem PC. Also, the account attempting remote access should be an administrator on the target computer.
A: Network Asset Tracker Pro uses WMI (Windows Management Instrumentation) through DCOM RPC. It requires special configuration of Windows Firewall in Windows XP SP2 and Windows Vista to allow remote connections. WMI needs to support connection with RPC and DCOM (TCP ports 135 and 445).
    You need to apply a special Windows Firewall policy which allows remote administration. You can use the Group Policy editor (Gpedit.msc) to allow remote administration:
  • Under the Local Computer Policy heading, open the Computer Configuration folder.
  • Open the Administrative Templates folder.
  • Open the Network folder.
  • Open the Network Connections folder.
  • Open the Windows Defender Firewall folder.
  • If the computer is in the domain then open the Domain Profile folder, otherwise open the Standard Profile folder.
  • Click Windows Defender Firewall: Allow inbound remote administration exceptions. (Former Windows Firewall: Allow remote administration exception.)
  • On the Action menu, select Properties.
  • Click Enable, and then click OK.

The step-by-step guide is provided here: "Connecting Through Windows Firewall"
A: In Windows XP and earlier, the WMI Windows Installer Provider is installed by default. In Windows 2003 the WMI Windows Installer Provider is an optional component. To install this provider, open the Control Panel Add/Remove Programs applet and click Add/Remove Windows Components. Select the Management and Monitoring Tools check box, then click Details. Select the WMI Windows Installer Provider check box, and click OK.
A: This typically results when the process trying to access the namespace does not have the required WMI privileges. The account attempting remote access should be an administrator on the target computer. In addition, the account might need to have a specific privilege enabled. To troubleshoot this error check the namespace security on the remote namespace to see the privileges enabled for the account.
    You can access the WMI Control and the Security tab in the Computer Management Console:
  • Right-click on My Computer and click Manage.
  • Double-click Services and Applications and then double-click WMI Control.
  • Right-click WMI Control and then click Properties.
  • In the WMI Control Properties dialog box click the Security tab.
  • A folder named Root with a plus sign (+) next to it should now be visible. Expand this tree as necessary to locate the namespace CIMV2.
  • Click the Security button. A list of users and their permissions appears. If the user is on that list modify the permissions as appropriate. Add "network service" account (from local computer accounts) and administrator account. If the user is not on the list, click the Add button, and add the user from the location (local machine, domain, etc.) where the account resides.
  • In order to view and set namespace security, the user must have Read Security and Edit Security permissions. Administrators have these permissions by default, and can assign the permissions to other user accounts as required.
  • If this user needs to access the namespace remotely, you must select the Remote Enable permission.
  • By default, user permissions set on a namespace apply only to that namespace. If you want the user to have access to that namespace and all subnamespaces in the tree below it, or in subnamespaces only, click the Advanced button. Click Edit and specify the scope of access in the resulting dialog box.

WMI Properties

A: The user does not have remote access to the computer through DCOM.
    Please, try the next on the problem PC:
  • Click Start, click Run, type DCOMCNFG, and then click OK.
  • In the Component Services dialog box, expand Component Services, expand Computers, and then expand My Computer.
  • On the toolbar, click the Configure My Computer button. The My Computer dialog box appears.
  • In the My Computer dialog box, click the COM Security tab.
  • Under Launch and Activate Permissions, click Edit Limits.
  • In the Launch Permission dialog box, follow these steps if your name or your group does not appear in the Groups or user names list: In the Launch Permission dialog box, click Add. In the Select Users, Computers, or Groups dialog box, add your name and the group in the Enter the object names to select box and then click OK.
  • In the Launch Permission dialog box, select your user and group in the Group or user names box. In the Allow column under Permissions for User, select Remote Launch, and then click OK.

DCOM Permissions

A: Network Asset Tracker Pro uses WMI (Windows Management Instrumentation) through DCOM RPC. Please, check services: "COM+ Event system", "Remote Procedure Call (RPC)" and "Remote Procedure Call (RPC) Locator" on the problem PC.
In Windows 2003 the WMI Windows Installer Provider is an optional component. To install this provider, open the Control Panel Add/Remove Programs applet and click Add/Remove Windows Components. Select the Management and Monitoring Tools check box, then click Details. Select the WMI Windows Installer Provider check box and click OK.
Network Asset Tracker Pro uses WMI (Windows Management Instrumentation) through DCOM RPC. It requires special configuration of Windows Firewall in Windows XP SP2 and Windows Vista to allow remote connections. WMI needs to support connection with RPC and DCOM (TCP ports 135 and 445).
    You need to apply a special Windows Firewall policy which allows remote administration. You can use the Group Policy editor (Gpedit.msc) to allow remote administration:
  • Under the Local Computer Policy heading, open the Computer Configuration folder.
  • Open the Administrative Templates folder.
  • Open the Network folder.
  • Open the Network Connections folder.
  • Open the Windows Defender Firewall folder.
  • If the computer is in the domain then open the Domain Profile folder, otherwise open the Standard Profile folder.
  • Click Windows Defender Firewall: Allow inbound remote administration exceptions. (Former Windows Firewall: Allow remote administration exception.)
  • On the Action menu, select Properties.
  • Click Enable, and then click OK.

The step-by-step guide is provided here: "Connecting Through Windows Firewall"
A: Please, try the next on the problem PC:
  • Click Start, click Run, type DCOMCNFG, and then click OK.
  • In the Component Services dialog box, expand Component Services, expand Computers, and then expand My Computer.
  • On the toolbar, click the Configure My Computer button. The My Computer dialog box appears.
  • In the My Computer dialog box, click the COM Security tab.
  • Under Launch and Activate Permissions, click Edit Limits.
  • In the Launch Permission dialog box, follow these steps if your name or your group does not appear in the Groups or user names list: In the Launch Permission dialog box, click Add. In the Select Users, Computers, or Groups dialog box, add your name and the group in the Enter the object names to select box and then click OK.
  • In the Launch Permission dialog box, select your user and group in the Group or user names box. In the Allow column under Permissions for User, select Remote Launch, and then click OK.

DCOM Permissions

A: Try to increase option "Response time". To do this, select menu "File" -> "Options", select "Agentless Scan". Set the value to 900 seconds.
A: Network Asset Tracker Pro supports network inventory with SNMP. For this just set your SNMP community name. For this choose menu "Options" and click "Agentless Scan".
SNMP Inventory
A: Create a distribution point
To assign the Agent, you must create a distribution point on the server.
  • Log on to the server as an administrator.
  • Create a shared network folder where you will put the Agent (.msi file). You can download .msi file here
  • Set permissions on the share to allow access to the distribution package.
  • Copy the package to the distribution point.
Create a Group Policy Object
  • Open up the "Group Policy Management" console.
  • Expand "Forest - Domains ". Right-click on "Group Policy Objects" and select "New"
  • Type a name for this new policy.
  • Click on the new policy and then select the "Settings" tab from the right-hand pane. There are two configuration headings: "Computer Configuration" and "User Configuration". Right-click anywhere in the panel and select "Edit"
  • Expand "User Configuration - Policies - Software Settings", right-click on "Software installation" and choose "New -> Package"
  • Select the network location of the MSI installation file.
  • In the next dialog that appears select "Assigned" and click "OK"
  • The NATPro Agent installer will appear in the "Software installation" panel. (You should wait for a while.)
  • When the package does appear, double-click on it to open properties and then select the "Deployment" tab.
  • Click "Install this application at logon" and select "Basic" for the user interface. Click "OK"
  • Close the "Group Policy Management Editor" window and return to the "Group Policy Management" window. Right click on the domain name in the tree and select "Link an Existing GPO" from the drop-down.
  • Select the new policy from the list and click "OK"
A: Yes. To use logon script select menu "File" -> "Options", then select "Scan Using Logon Script".
All you need is to set up shared folder where an inventory tool agent.exe will be placed and shared folder where resulting files will be saved.
To create a new logon script you should click "Create logon script" button. If you already have logon script please click "Update existing logon script" button.
Usually logon scripts are located in the folder "%systemroot%\SYSVOL\sysvol\domain_name\scripts". You can assign a logon script to a user account. When a user logs on and a path to a logon script is present in the user account, the file is located and run.
The agent.exe closes immediately after the logon script ends.
Logon Script
A: Yes. You can import the custom columns and their data from Network Asset Tracker.
To do this please do the next:
  • Open menu "Database" and choose "Import Data from NAT".
  • Dialog with notification appears. Click "Yes" button.
  • Choose the NAT's data file "Computers.xml". By default this file is situated in the Network Asset Tracker "C:\Program Files (x86)\Network Asset Tracker".

A: For Windows 98 and Windows NT 4.0, WMI is available as an Internet download from http://www.microsoft.com/downloads. Search for the download "Windows Management Instrumentation (WMI) CORE 1.5 (Windows 95/98/NT 4.0)."
A: The Windows Management service starts automatically on computers running Windows NT, but not on computers running Windows 95/98. To set up the Windows Management service to start automatically on a Windows 95/98 system, please, run regedit.exe and change the following values:

[HKEY_LOCAL_MACHINE\Software\Microsoft\OLE]
"EnableDCOM"="Y"
"EnableRemoteConnect"="Y"

[HKEY_LOCAL_MACHINE\Software\Microsoft\WBEM\CIMOM]
"SetupForDCOM"="1"
"AutostartWin9X"="2"
"EnableAnonConnections"="1"
A: Network Asset Tracker Pro can get information from remote PC through WMI (agentless method) or, if you have any problems with WMI, you can use
"NAT Pro - Agent" installed on remote PC.
Network Asset Tracker Pro automatically detects if "NAT Pro - Agent" is installed on remote computer. All you need is to open port TCP 25001.
A: You should use the following command line arguments:

> natrackerproagent.msi REINSTALLMODE=voums REINSTALL=all REBOOT=reallysuppress
A: This problem can be solved with the installation of the Microsoft hotfix KB956523.
A: Network Asset Tracker Pro is shareware, not adware or spyware! Network Asset Tracker Pro will never send any data to us!

Copyright © 2002-2024 MIS Utilities. All rights reserved.
Privacy | Contact us