![]() Remote Desktop Screenshot
Remote Desktop Screenshot

Key features:
Remote Desktop Screenshot - Screenshots
Remote Desktop Screenshot - How To Use
Remote Desktop Screenshot Structure
Remote Desktop Screenshot consists of two parts:To capture a remote screenshot you should install "RDS Service" on the remote PC.
System requirements
Platform:
Microsoft Windows.
Hardware requirements:
No special requirements.
First Run
When you first run the program, you must add the user's computers to your list.
You can add computers manually one-by-one, or you can run the automatic adding process, which will add all the computers in your network to the list. Also you can import list of computers from file.
To add a computer manually, you must choose the menu "Computer", and then click on the submenu "New Computer". You should then type the NetBIOS-name of the computer that you want to add.
To run the automatic adding process and you must choose the menu "Computer", and then click on the submenu "Find Computers". After this the Remote Desktop Screenshot will search for computers in your local network.
Capture remote screenshot
On the left side of Remote Desktop Screenshot window you will see thumbnails of remote computers' desktops. On the right side you can see screenshot of selected computer.
To capture remote screenshot you should install "RDScreenshot Service" on the remote PC.
After this you can capture a screenshot by double clicking on the computer thumbnail.
Add computers
You can add computers manually one-by-one, or you can run the automatic adding process, which will add all the computers in your network to the list. Also you can import list of computers from file.
To add a computer manually, you must choose the menu "Computer", and then click on the submenu "New Computer". You should then type the NetBIOS-name of the computer that you want to add.
To run the automatic adding process, you must choose the menu "Computer", and then click on the submenu "Find Computers". After this the Remote Desktop Screenshot will search for computers in your local network.
Delete computer
You can delete computers from list with the menu command "Computer->Delete Computer", or by pressing the "Del" key.
Get a remote screenshot
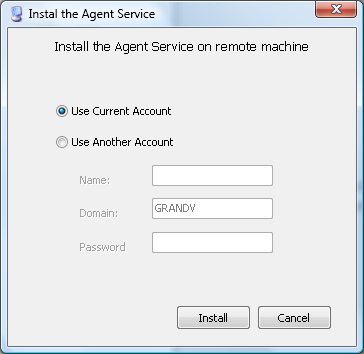
Before getting the remote screenshot you should install the agent service.
To install the agent service on remote computer you should choose menu "Computer" - "Install Agent".
Thumbnail shows the state of remote computer
 | - remote computer is offline |
 | - remote computer is on-line but the agent service is not available |
 | - remote computer is on-line and the agent service is available |
Clicking on a computer thumbnail in list will show this computer's screenshot in a window on the right-hand side of the screen, double clicking will update the screenshot.
On the status bar you can see the quantity of computers on your list.
Use Scheduler
You can use scheduler to update the screenshots from remote PCs. To do this, choose "File" from the main menu, and then choose the submenu "Options". In "Options" form choose "Scheduler".

You can set time and interval for the updating. Many scheduling options are available, depending on which schedule you use (hour, day, month).
Also you can set the updating period for every computer. For this you should type the period in seconds in the edit box on the right side of the screen.
Copyright © 2002-2024 MIS Utilities. All rights reserved.
Privacy | Contact us